

Komodo: The Better Alternative to Portainer for Container Management
This article explains why Komodo is the better alternative to Portainer and how it works for beginners and advanced users.
-

- •

Almost everyone who works with Docker eventually comes across Portainer. It's the tool that everyone uses to create and manage containers. But what if there was a significantly better alternative?
Overview
In this guide, we will be working with a Git repository. You can use Komodo without Git, as you would in Portainer - however, for me, Git integration is an essential advantage.
Git is a version control system that tracks and documents changes to files over time. A Git repository is the storage location that contains the complete history of all changes and versions of a project.
Another major advantage of Git is that through cloud hosting services like GitHub or GitLab, you can access and edit your files from any device with an internet connection. Additionally, the files in a Git repository are independent of specific software and can be opened and edited with various development tools.
To follow this guide, you need a Git repository. The easiest way is to create an account on GitLab or GitHub. You can also use self-hosted Git servers like Gitea or Forgejo if you have one.
If you've never worked with Git before, I recommend starting with a crash course using the following video:
Komodo works with both Docker and Podman. In this guide, I will be working with Docker. Different steps may be required for Podman.
Make also sure you are using the latest version of Komodo at least version 1.17 is required.
Komodo vs. Portainer – Feature Comparison
Here is a short comparison between Komodo and Portainer.
| Feature | Komodo | Portainer |
|---|---|---|
| License / Pricing | Open source, all features freely available | Open source (Community Edition) + Business Edition with advanced features |
| Scalability | Unlimited servers & stacks | Community Edition limited to single nodes or clusters |
| Build Functionality | Integrated build system via Builders (incl. cloud support) | No integrated build feature – requires external CI/CD |
| Automation / API | Fully open and unlimited API | API available, partly restricted to Business Edition |
| Git Integration | Yes, full support for Git repositories for Compose files and resource management | Only available in Business Edition |
| UI/UX | Minimalistic, developer-focused interface | User-friendly, highly graphical interface |
| Docker Stack Management | Strong Compose support, resources managed via TOML definitions | Good Docker Compose support (via GUI), but more limited in comparison |
| Kubernetes Support | No (focused on Docker / container management) | Yes (in Business Edition) |
| Migration from Portainer | Gradual migration supported | No tools provided for migrating to other platforms |
| Server Templates | Supports server templates for AWS and Hetzner | Not available |
| Server Monitoring & Notifications | Monitors CPU, RAM, and disk usage on managed servers, with customizable alerts | Only available with external tools or limited in scope |
| Image Update Notifications | Yes, highlights when container image updates are available | Not available in Community Edition |
| Resource Usage | Lightweight, minimal architecture | More resource-heavy (UI-focused) |
| Target Audience | DevOps teams focused on flexibility and automation | DevOps, developers, and admins focused on GUI-based management |
Here are my favorite advantages:
- With Komodo, you can see immediately when stacks are outdated due to new images. You can automate this process or just get notified when new images are available. It essentially has an integrated Watchtower.
- Unlike Portainer, Komodo feels like it was built for multi-server environments. With Portainer, you always have to connect to each server first - with Komodo, you have everything at a glance.
- There is a very good search function to quickly reach your goal.
- Directly integrated server monitoring for CPU, RAM, and disk usage.
- The direct Git integration makes it very easy to update stacks, and you also have an immediate backup of your files.
- A significantly better error description when something goes wrong during deployment. This can also be retrieved afterwards.
Komodo Core Installation
Let's start with installing Komodo Core - the heart of the system. For this we need the following components:
- The database for Komodo Core
- Komodo Core itself
- Since I'm using PostgreSQL, FerretDB is needed as an interface to MongoDB. (This is not necessary when using MongoDB directly)
I'm working with Debian 12 as the operating system here, though other operating systems like Ubuntu should work as well. Docker and Docker Compose must be pre-installed for the next steps.
After we have installed everything, we first create a folder for the core installation. I always use /docker/komodo for this, but the choice of directory is up to you.
mkdir /docker/komodoThen I navigate to this folder to create the docker-compose file for Komodo Core.
cd /docker/komodoIn this folder, create the docker-compose.yaml file. Use Nano or Vim, whichever you prefer.
nano docker-compose.yamlInsert the following configuration here:
services:
  postgres:
    image: postgres:17
    container_name: komodo-postgresql
    labels:
      komodo.skip:
    restart: unless-stopped
    logging:
      driver: local
    # ports:
    #   - 5432:5432
    volumes:
      - pg-data:/var/lib/postgresql/data
    environment:
      - POSTGRES_USER=${KOMODO_DB_USERNAME}
      - POSTGRES_PASSWORD=${KOMODO_DB_PASSWORD}
      - POSTGRES_DB=${KOMODO_DATABASE_DB_NAME:-komodo}

  ferretdb:
    image: ghcr.io/ferretdb/ferretdb:1
    container_name: komodo-ferretdb
    labels:
      komodo.skip:
    restart: unless-stopped
    depends_on:
      - postgres
    logging:
      driver: local
    # ports:
    #   - 27017:27017
    environment:
      - FERRETDB_POSTGRESQL_URL=postgres://postgres:5432/${KOMODO_DATABASE_DB_NAME:-komodo}

  core:
    image: ghcr.io/moghtech/komodo-core:latest
    container_name: komodo-core
    labels:
      komodo.skip:
    restart: unless-stopped
    depends_on:
      - ferretdb
    logging:
      driver: local
    ports:
      - 9120:9120
    env_file: .env
    environment:
      KOMODO_DATABASE_URI: mongodb://${KOMODO_DB_USERNAME}:${KOMODO_DB_PASSWORD}@ferretdb:27017/${KOMODO_DATABASE_DB_NAME:-komodo}?authMechanism=PLAIN
    volumes:
      ## Core cache for repos for latest commit hash / contents
      - repo-cache:/repo-cache
      ## Store sync files on server
      # - /path/to/syncs:/syncs

volumes:
  # Postgres
  pg-data:
  # Core
  repo-cache:
For this, a .env file must be created in the same directory:
nano .env# DB credentials
KOMODO_DB_USERNAME=DB-Username
KOMODO_DB_PASSWORD=aStrongPassword
# Configure a secure passkey to authenticate between Core / Periphery.
KOMODO_PASSKEY=a_random_passkey
# General
KOMODO_HOST=https://demo.komo.do
KOMODO_TITLE=Komodo
KOMODO_DISABLE_CONFIRM_DIALOG=false
KOMODO_MONITORING_INTERVAL="15-sec"
KOMODO_RESOURCE_POLL_INTERVAL="5-min"
# Secrets
KOMODO_WEBHOOK_SECRET=a_random_secret
KOMODO_JWT_SECRET=a_random_jwt_secret
# Auth
KOMODO_LOCAL_AUTH=true
KOMODO_DISABLE_USER_REGISTRATION=false
KOMODO_ENABLE_NEW_USERS=false
KOMODO_DISABLE_NON_ADMIN_CREATE=false
KOMODO_TRANSPARENT_MODE=false
KOMODO_JWT_TTL="1-day"Please note, this is only a basic configuration. There are many more settings that can be adjusted, such as SSO etc.
Please replace KOMODO_DB_USERNAME and KOMODO_DB_PASSWORD with a different username and password.
For KOMODO_PASSKEY, KOMODO_WEBHOOK_SECRET and KOMODO_JWT_SECRET you can generate and insert a random key. Here's how to do it:
openssl rand -hex 32For additional security, you can use -hex 64 instead of 32.
Finally, you need to adjust KOMODO_HOST to the FQDN that you want to use for Komodo. If you want to access it locally via IP, you can enter the IP there, e.g. http://192.168.1.10
Once that's all done, you can start Komodo Core by executing the following command (still in the same directory):
docker compose -p komodo up -dThe Komodo Web Interface should now be accessible via the server's IP address and port 9120.
Create the first Komodo user
When you connect to the web interface, you need to enter a Username and Password. To create the first Super Admin, simply click Sign Up instead of Log In after entering your details - this will create the first user.
This only works for the first user - don't worry, not everyone can perform this action, only you during the initial setup.
After the first login, the dashboard will initially be empty - this is completely normal. To add a server, Komodo Periphery must first be installed.
Periphery Agent Installation
Now that Komodo Core is running successfully, we still need to install the Periphery Agent. This is similar to the Portainer Agent, which can be installed on other systems to manage them.
For example, if you have a Proxmox server with multiple VMs and Docker running on all of them, you can install the Periphery Agent on each VM and manage all these servers from a single Komodo Core panel.
You can also install the Periphery Agent on the same server as Komodo Core to manage all containers running on it and Komodo itself. It's important to note that Periphery must be run either as a Systemd service or as a container in a separate stack.
If you want to install Komodo as a Systemd service, use the following script:
curl -sSL https://raw.githubusercontent.com/moghtech/komodo/main/scripts/setup-periphery.py | python3If you prefer to use Docker instead, I have a script here that you can save on each of your servers to install and update the Periphery Agent.
nano periphery-agent.sh#!/bin/bash
### Configurable Variables ###
IMAGE="ghcr.io/moghtech/komodo-periphery:latest"
CONTAINER_NAME="komodo-periphery"
PORT_MAPPING="8120:8120"
PERIPHERY_PASSKEY="YOUR_PASSKEY_HERE" # <-- Insert your passkey here
SSL_ENABLED="false"
REPO_DIR="/etc/komodo/repos"
STACK_DIR="/etc/komodo/stacks"
SSL_KEY_FILE="/etc/komodo/ssl/key.pem"
SSL_CERT_FILE="/etc/komodo/ssl/cert.pem"
INCLUDE_DISK_MOUNTS="/etc/hostname"
### Stop and remove existing container if it's running ###
if docker ps -a --format '{{.Names}}' | grep -q "^$CONTAINER_NAME$"; then
echo "Stopping running container: $CONTAINER_NAME"
docker stop $CONTAINER_NAME
docker rm $CONTAINER_NAME
fi
### Pull Docker image ###
echo "Pulling image: $IMAGE"
docker pull $IMAGE
### Start the container ###
echo "Starting new container: $CONTAINER_NAME"
docker run -d \
--name "$CONTAINER_NAME" \
--restart unless-stopped \
--log-driver local \
-p $PORT_MAPPING \
-e PERIPHERY_REPO_DIR="$REPO_DIR" \
-e PERIPHERY_STACK_DIR="$STACK_DIR" \
-e PERIPHERY_SSL_ENABLED="$SSL_ENABLED" \
-e PERIPHERY_SSL_KEY_FILE="$SSL_KEY_FILE" \
-e PERIPHERY_SSL_CERT_FILE="$SSL_CERT_FILE" \
-e PERIPHERY_PASSKEYS="$PERIPHERY_PASSKEY" \
-e PERIPHERY_INCLUDE_DISK_MOUNTS="$INCLUDE_DISK_MOUNTS" \
-v /var/run/docker.sock:/var/run/docker.sock \
-v /proc:/proc \
-v /etc/komodo:/etc/komodo \
"$IMAGE"
In the script, enter the KOMODO_PASSKEY from Komodo Core's .env file into the PERIPHERY_PASSKEY. These values must match to establish a connection.
After that, the permissions for modifying the script need to be set up.
chmod +x periphery-agent.shFinally, you can execute the script with the following command:
./periphery-agent.shIf there is an update for the Periphery Agent, you can simply run this script again - the latest version will then be automatically downloaded and applied.
Add your first server
Now we'll add the first server. Open the Komodo Web Interface and navigate to the Servers section. There, click on New Server and assign a name.
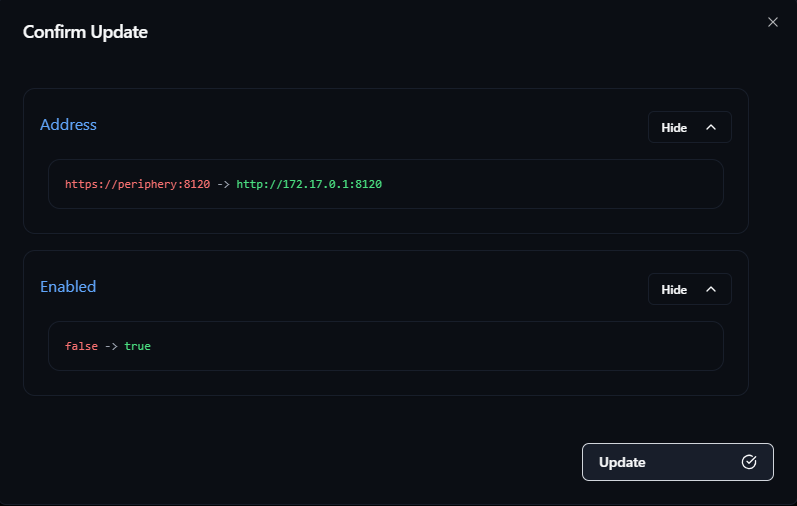
Now you need to configure the server. It is important to enter the correct address and activate the server.
The address differs depending on how the Periphery Agent is hosted:
- If you use a systemd service on the same server/VM as Komodo Core, you must use
http://127.0.0.1:8120. - If you host the Periphery Agent in a Docker Stack on the same server as Komodo Core, then
http://172.17.0.1:8120should work. If it doesn't work, you can use the following command to connect the Komodo container to the bridge network:
docker network connect bridge komodo-core- For all connections to another server/VM, you must specify the IP address along with port
8120. Example: If Komodo Core is running on a VM with IP address192.168.1.20and Periphery is installed on a VM with IP address192.168.1.30, then usehttp://192.168.1.30:8120.
Note that you use HTTP, unless you are working with certificates and want to connect Komodo Core and the Periphery Agent via HTTPS. This is essential when the connection goes through the Internet.
The above specifications may vary depending on the server and network.
After that, switch the toggle from Disabled to Enabled to mark the server as active.
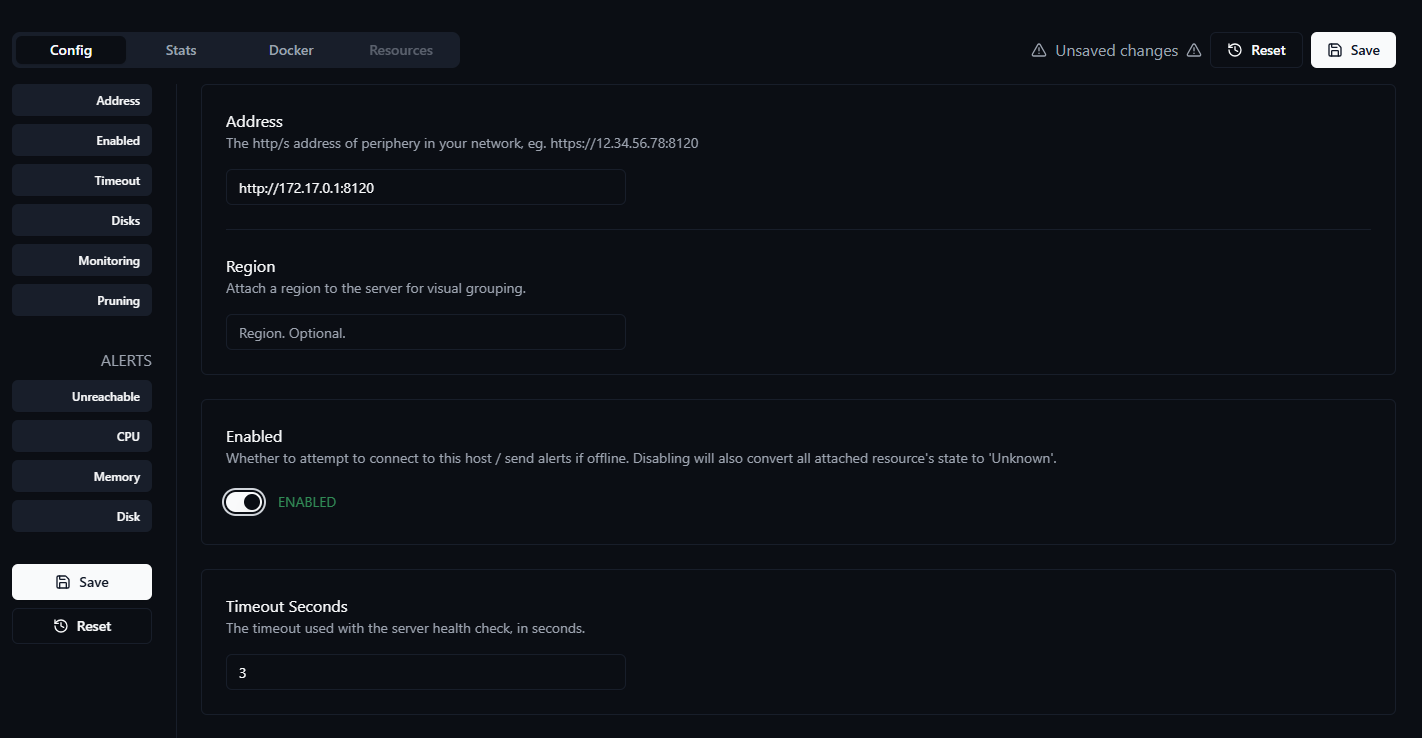
Save the applied settings. Note that you must always confirm twice (unless you explicitly change it in Core's env settings).
The server should now be shown as OK. If this is not the case, there is an error somewhere. If you need help, you can find support either on my Discord server or on Komodo's official Discord server.
Under Stats you can see general information about the server, utilization, free storage space and information about processes running on the server.
Under Docker you can see all containers that are running on the server, as well as networks, volumes and images.
Add a Git Account to Komodo
Now let's start with the Git integration. For this, you need one of the accounts mentioned above, such as GitLab or GitHub. For both platforms, you additionally need an Access Token, which Komodo can use to authenticate.
Github Access Token
There are two different types of keys here: the Tokens (classic) and Fine-grained tokens. The Fine-grained tokens provide a bit more security and are therefore the recommended method – however, both work.
- Go to GitHub settings: https://github.com/settings/tokens
- Generate a new token
- Give the token a name, set the expiration to
No expirationand selectOnly select repositories. Then choose the repository you want to use with Komodo. - Further down under
Repository permissions, the correct permissions must now be set. For this, select theRead and writepermission underContents. - Then click on
Generate tokenbelow.
Gitlab Access Token
- Go to your repository in Gitlab, then scroll down to
Settings, and then toAccess tokens. - Under
Project access tokensclick onAdd new token. - Give the token a name and remove the
Expiration dateby clicking on thex. - Set the
roletoOwner. - Under "Select scopes" enter the following permissions:
read_repositoryandwrite_repository - Then click on
Create personal access token.
Add the provider to Komodo
- Navigate in Komod to
Settings>Providers. - Under
Git Accountsclick onNew Account. - Under
Domain, enter e.g.gitlab.comorgithub.com. Use httpsmust be set toonunless you are using your own git server that is not accessible locally via https.- Enter your GitHub or GitLab account username.
- Now insert the token generated above.
Komodo Resource Syncs
The resources should be synchronized with the Git repository. This serves both as a backup for Komodo and provides the ability to store the Docker Compose files in the Git repository later and transfer them directly to the client.
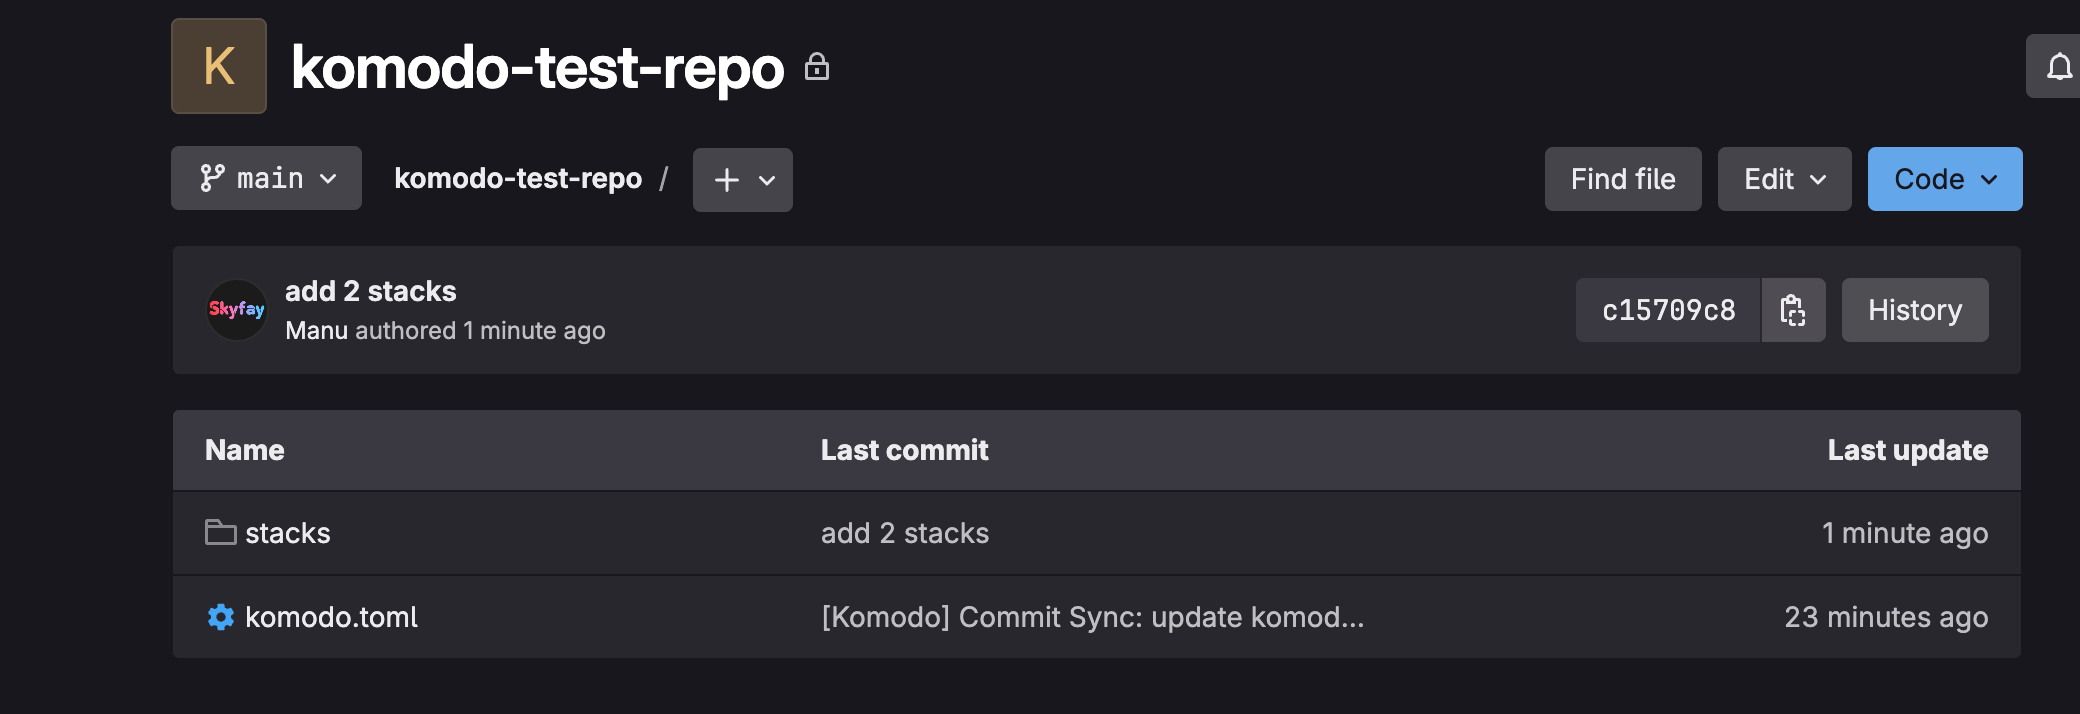
I am now using a test repository komodo-test-repo on Gitlab, simply follow the same steps with your repository on your Git provider.
Add Resource Sync in Komodo
Go to Syncs in Komdo and create a new Resource Sync.
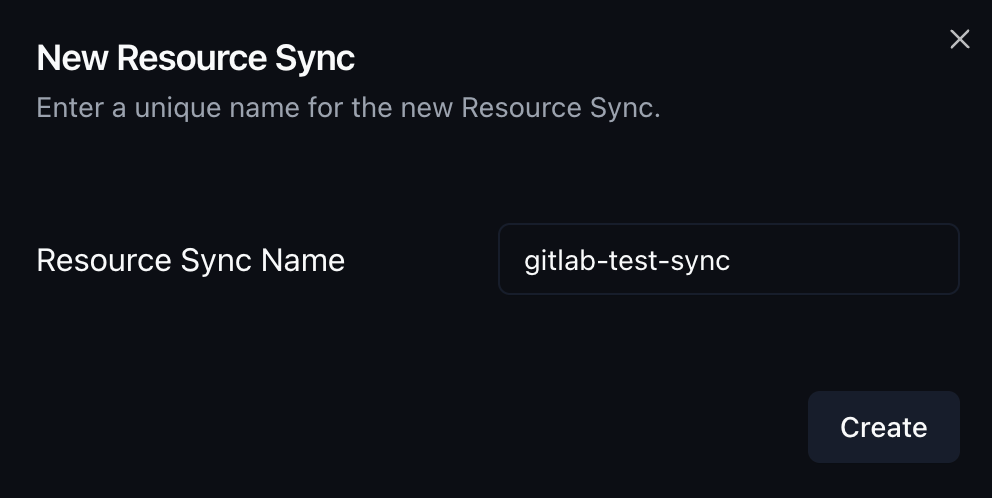
Now we will configure the sync:
- Select
Git RepounderConfig>Choose Mode. - Select the git provider domain you use.
- Select the account that you created earlier.
- For
repo, enter the repository you want to use. You need to specify the namespace, which in this case is your username. It looks like this:Skyfay/komodo-test-repo - Leave the
branchonmainunless you have a special setup, and you can ignore the commit hash. - Now under General we specify where the
komodo.tomlfile should be in the repository. You can put it in a subdirectory by enteringsubdirectory/komodo.tomlor leave it in the root of the repository. I will leave it in the root so I'm simply enteringkomodo.toml. - Now enable
Delete Unmatched ResourcesandManaged.
That's it - now click on Save and confirm.
You will now see that your sync has failed. Don't worry, this is how it should be. Go to the Info tab below and you will see that the file does not exist yet and can be initialized. Execute this by clicking on Initialize File.

The sync should now be set to Pending. Go to the Pending tab at the bottom to see which configurations have not yet been synchronized. You will see that both the previously added server and the resource sync are displayed.
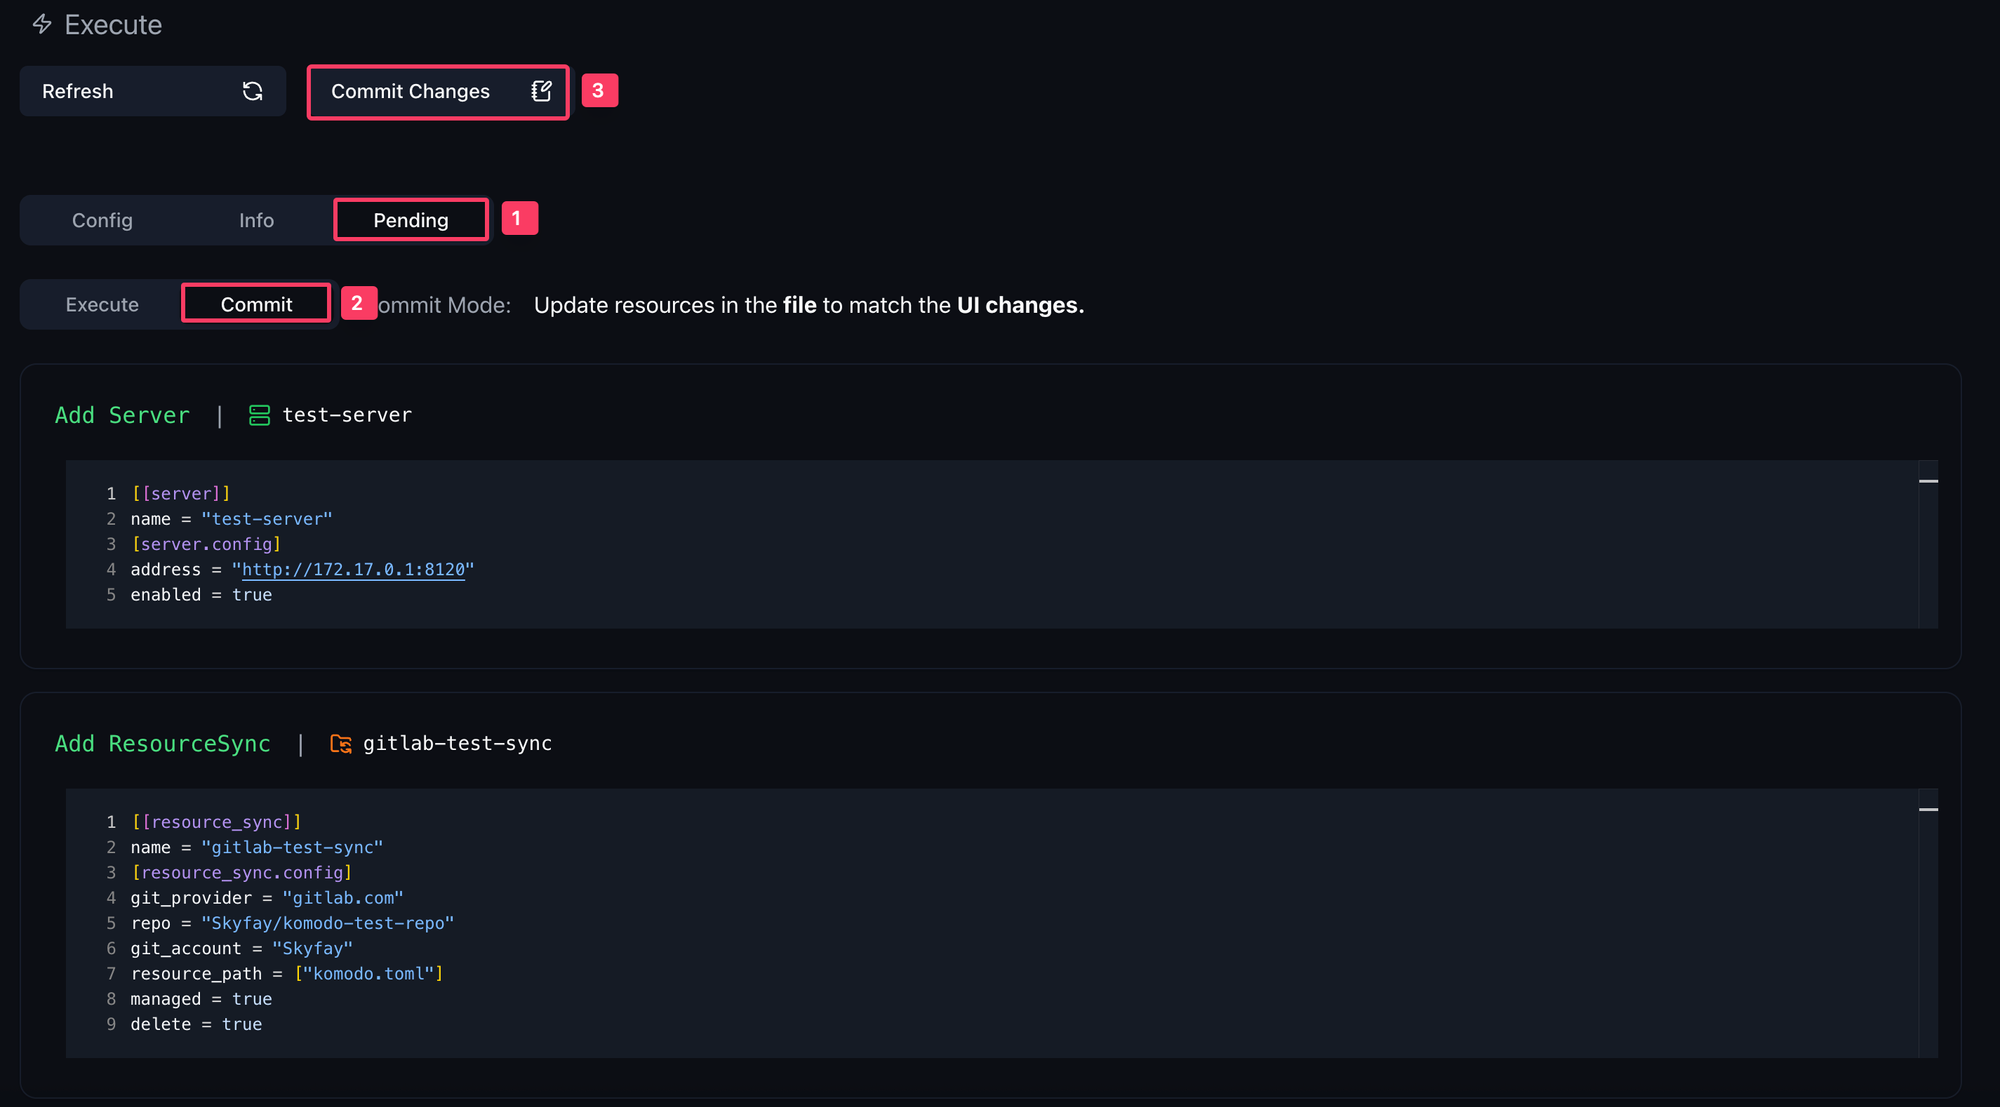
Now the sync is marked as OK. Every time you make new servers, stacks, deployments, or other configurations in the Komodo UI, you must perform a commit here. If you make changes in the komodo.toml and want to apply them in Komodo, you need to perform an Execute. In the Pending view, you can always see what happens when you perform either action.
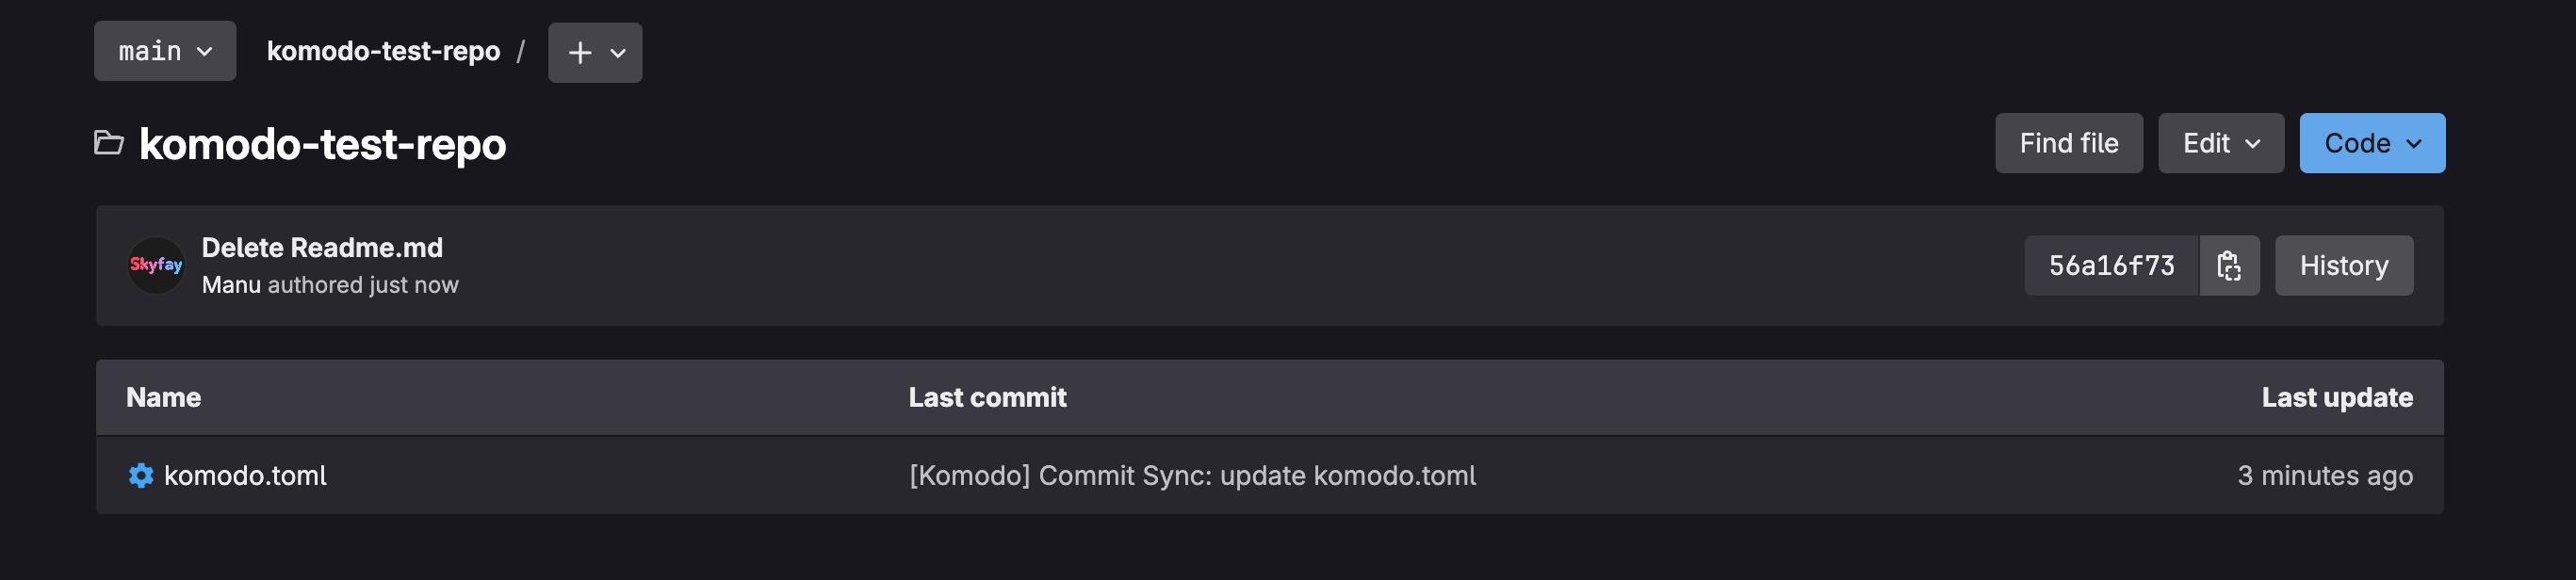
When you now open a repository in the browser, you should see the komodo.toml file.
Creating and deploying Docker Compose stacks.
I will now use VS Code to create the compose files. You can also use other techniques - what's important is that the files end up in the Git repository.
Git Repository Structure
You can structure your Git repository however you like. And yes, you can store multiple compose stacks in one repository and then deploy them via Komodo - you don't need a separate repository for each one.
For this test I will create the structure as follows:
komodo-test-repo/
├── stacks/
│   ├── nginx/
│   │   └── compose.yaml
│   └── uptime-kuma/
│       └── compose.yaml
└── komodo.toml
Create the files
So first I'll create the files in VS Code.
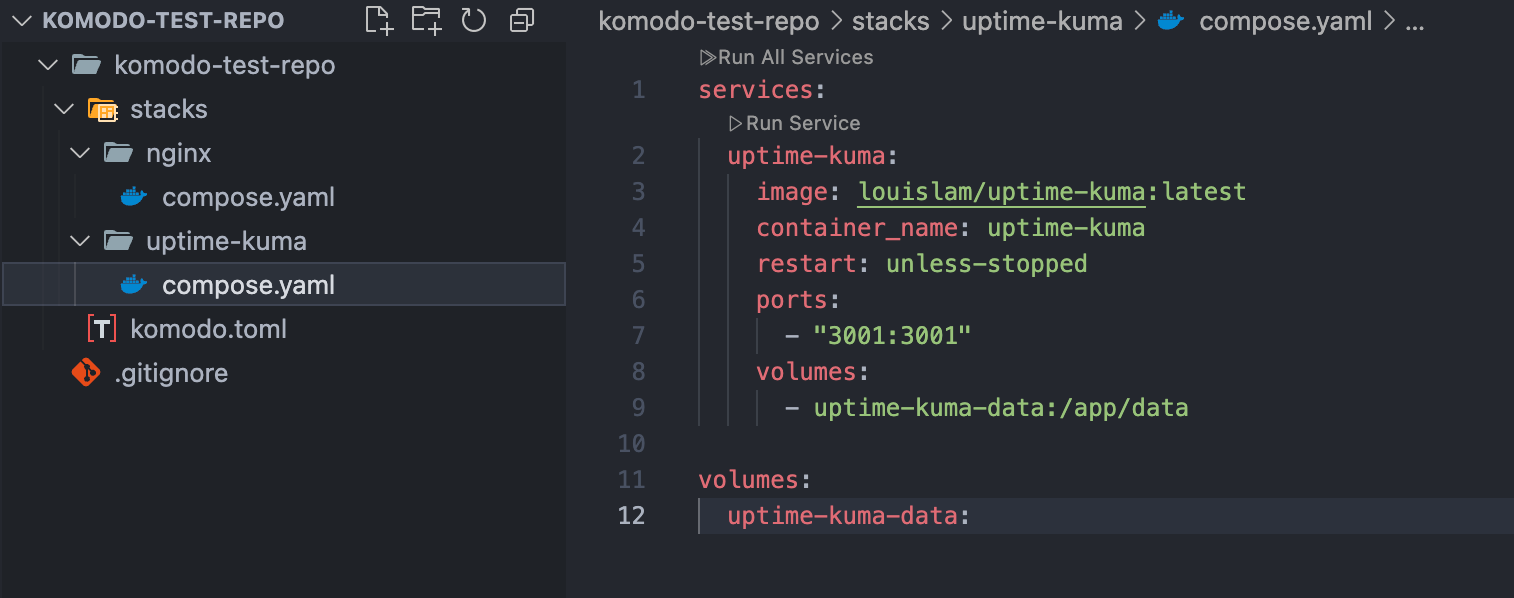
For this test I am using a small Uptime Kuma configuration:
services:
  uptime-kuma:
    image: louislam/uptime-kuma:latest
    container_name: uptime-kuma
    restart: unless-stopped
    ports:
      - "3001:3001"
    volumes:
      - uptime-kuma-data:/app/data

volumes:
  uptime-kuma-data:
After that, the changes only need to be pushed to the Git repository.
Create the first Stack in Komodo
Now open the Stacks page in Komodo. Click on New Stack and enter a name for the stack. I use uptime-kuma here.
Now we configure the stack:
- Under
Serverselect the server where you want to deploy the stack. I am using thetest-serverI created earlier. - Select the Mode
Git Repo. - Again, select your Git provider and your account.
- Now we have to specify the repository again. In my case, this is
Skyfay/komodo-test-repo. - Then we go further down to
Files. We have to specify where ourcompose.yamlfile is located. Therun directoryin my case isstacks/uptime-kuma. The path is always relative to the root of the repository. UnderFile Pathsyou don't need to do anything unless your compose.yaml has a different name. If you name it docker-compose.yaml for example, then you need to click the+there and enter exactly that, sodocker-compose.yaml. - I will explain environment variables shortly, in this example we will omit them.
- With Auto Update, you can choose what you want.
Poll For Updatescontinuously checks if a new image is available. However, this only works under the same tag, e.g., Latest, not if you have specified an explicit image version. The UI will then show you when new images are available and you can trigger a redeploy manually.Auto Updateperforms a redeploy when a new image is found.Full Stack Auto Updatewould redeploy the entire stack when a new image is found.
And that's it. Now click on Save to save the stack. Now all you need to do is click on Deploy and your stack will be executed.
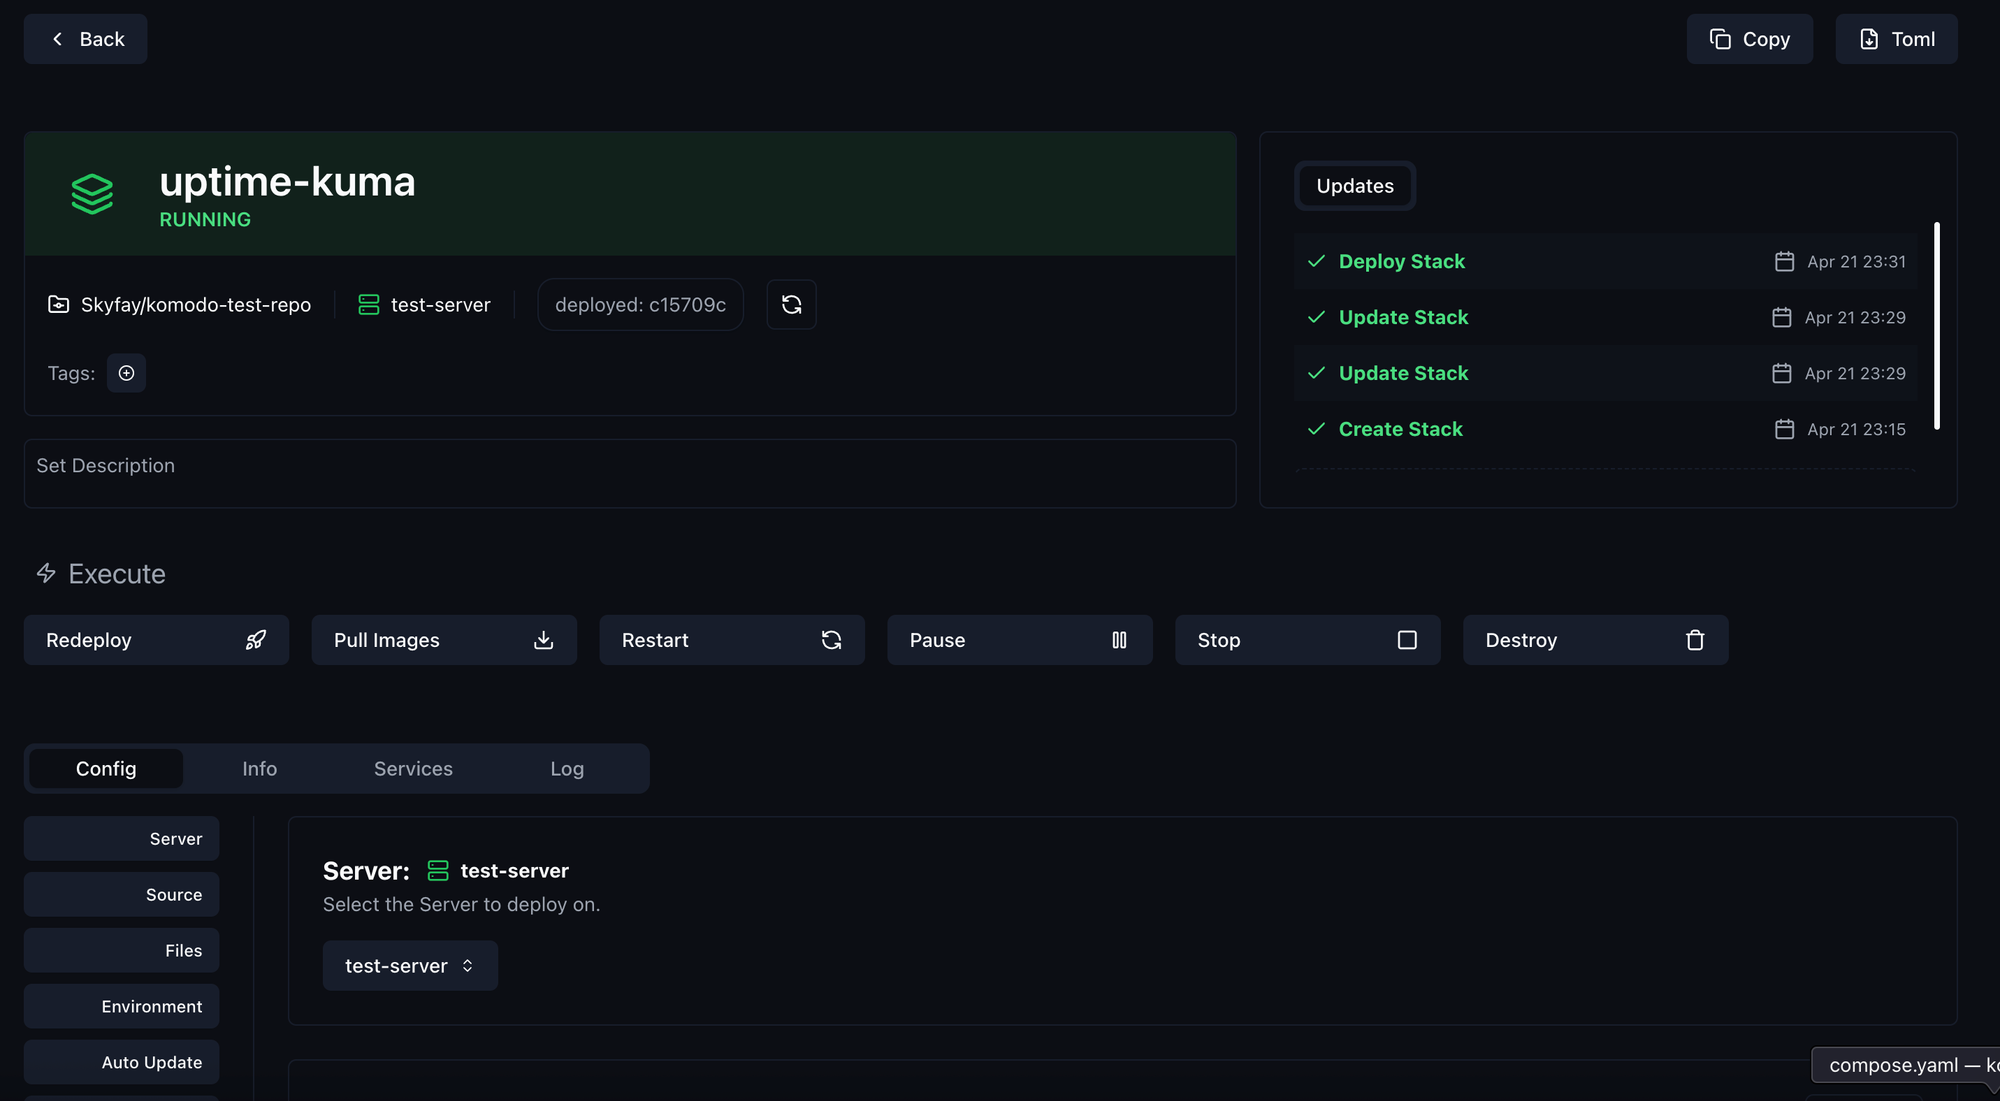
Open the IP of your server (localhost if you have Periphery locally) and then additionally specify the Uptime-Kuma port (3001 in this case).
Congratulations, you have successfully created and deployed your first stack.
Advanced Configurations and FAQ
Now let's dive into some deeper aspects that might still come up. I will continue answering aspects about Komodo here. If you still have questions, there are the following points of contact:
- Official Komodo Documentation
- Official Komodo Discord Server
- The Github page of Komodo with Issues and Discussions
I don't want environment variables to be stored in plaintext in the git repository.
There are many different ways in which environment variables can be used here. I refer to a blog article by FoxxMD which describes the whole thing very nicely.
Personally, I store all environment variables that don't need to be secret in the compose.yaml file in the Git repository. I store the secrets that need to be secure as Secrets in Komodo. You can find these under Settings > Variable.
How does this work? I will now use a snippet from my SemaphoreUI compose.yaml file.
services:
  # Database
  postgres:
    restart: unless-stopped
    image: postgres:14
    container_name: semaphore-postgres
    hostname: postgres
    volumes:
      - /docker/semaphore/database:/var/lib/postgresql/data
    environment:
      POSTGRES_USER: ${DB_USER}
      POSTGRES_PASSWORD: ${DB_PASSWORD}
      POSTGRES_DB: ${DB_NAME}
  # Semaphore
  semaphore:
    container_name: semaphore
    restart: unless-stopped
    ports:
      - 3000:3000
    image: semaphoreui/semaphore:latest
    volumes:
      - /docker/semaphore/inventory:/inventory:rw
    environment:
      # Database
      SEMAPHORE_DB_USER: ${DB_USER}
      SEMAPHORE_DB_PASS: ${DB_PASSWORD}
      SEMAPHORE_DB_HOST: postgres
      SEMAPHORE_DB_PORT: 5432
      SEMAPHORE_DB_DIALECT: postgres
      SEMAPHORE_DB: ${DB_NAME}
      # Basic Settings
      SEMAPHORE_WEB_ROOT: ${WEB_ROOT}
      SEMAPHORE_PLAYBOOK_PATH: /tmp/semaphore/
You can see that I have the database username, password and database name as secrets in Komodo here. These values are read directly from the .env file, which Komodo creates by default during deployment.
Now this secret needs to be created in Komodo. I click on New Variable and then enter a unique name. This name can only exist once and should ideally be created in the following format: YOUR_ENVIRONMENT_VARIABLE. As an example, I will use SEMAPHORE_DB_USER_SECRET.
Now you need to set the Value parameter, which will ultimately be used as a variable in the compose.yaml. So here in the example the name of the database user. You should then make sure that it is also treated as a Secret by setting Secret to On.

So now you have the environment variable in the compose.yaml and the variable in Komodo with the value. These now need to be linked. You do this in your stack settings.
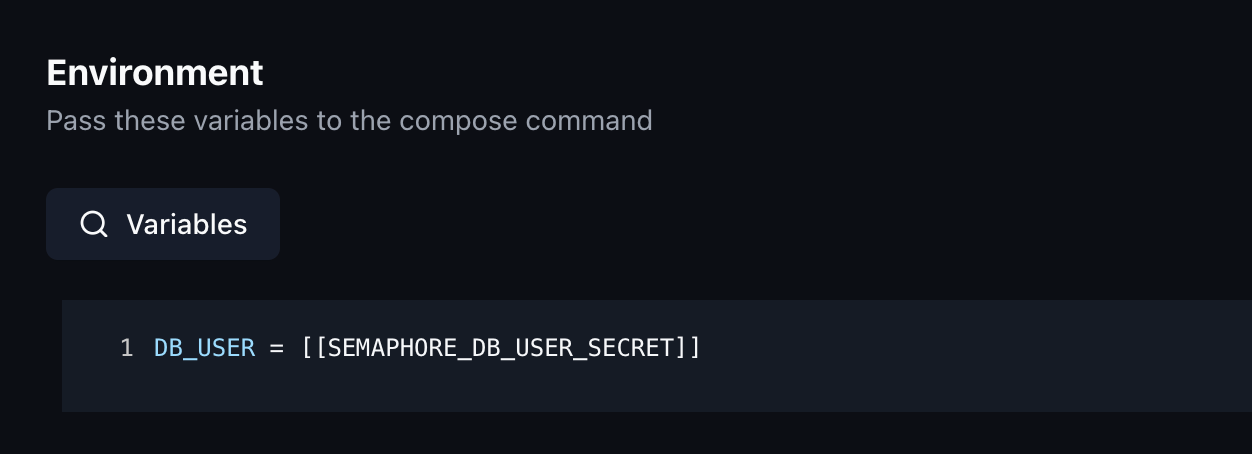
Open your stack, in my case Semaphore, and then go down to Environment in the Config menu.
Now look at what the value in the brackets in your compose.yaml file is called and copy it into the editor. In my case it would be DB_USER.
Then you make an = sign and insert the Komodo variable on the right side. At the top, you have a search icon where you can search for the variable, and when you click on it, it copies to your clipboard. Then you just need to paste it.
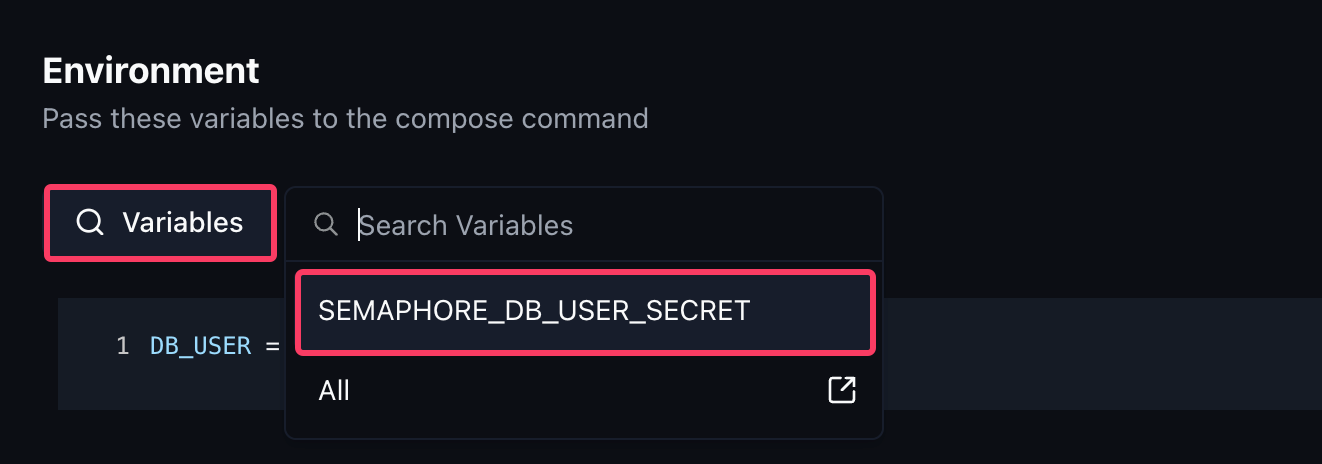
In the end, it should look like this:
What exactly is happening here right now?
When you deploy the stack, a .env file is created on the system where the stack is built, next to the compose.yaml file. Komodo then copies what you defined under Environment into it. In this case, it's DB_USER = semaphore-db-user since Komodo needs to store the value for Docker in plain text. This process is also called interpolation.
Docker then searches for the file when starting up and can perfectly insert this value, since we have configured the environment variables accordingly so that it looks for DB_USER": "SEMAPHORE_DB_USER: ${DB_USER}.
You can think of it like a chain:
SEMAPHORE_DB_USER_SECRET (Komodo Variables) to [[SEMAPHORE_DB_USER_SECRET]] (Environment in your Stack) to DB_USER (Environment in your Stack) to DB_USER (in your compose.yaml) to SEMAPHORE_DB_USER (in your compose.yaml target)
I want to import an existing stack from Portainer
You can indirectly import stacks that you have deployed with Portainer into Komodo. To do this, create the stack in your Git repository and add it through Komodo under Stacks.
The only thing we need to do then is connect the Komodo stack with the deployed Portainer stack. For this, we need to know the command used to start the stack via Portainer, or more specifically, its name.
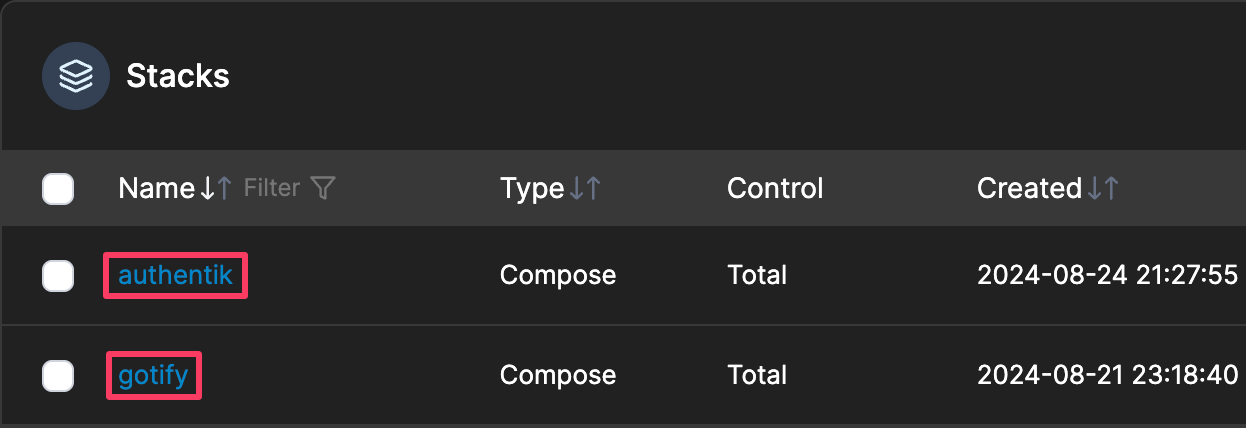
If we take authentik as an example, the command that Portainer uses to start the stack is docker compose -p authentik up -d.
If the stack in Komodo also has the name authentik, then we don't need to take any further action. If the stack in Komodo has a different name, e.g., we named it auth-stack, then we need to specify the Project Name under Config > Advanced in our stack, with which the stack was originally started, in this case authentik.
Therefore, Komodo can then use the same name for deploying the project and has thus "imported" the stack.

How do notifications work?
In Komodo there is a menu item called Alerters where you can configure various notifications. Click on New Alerter to create a new one and give it a name of your choice.
Set Enabled to On. There are various options for Endpoint. At the time of this article, Komodo directly supports the following platforms:
If your service that you want to use is not included, there are Images from FoxxMD available, which you can use to configure additional notifications. For example, a Gotify Alerter or an Apprise API Alerter, which supports numerous platforms such as email, Home Assistant, IFTTT and many more.
I'm making an example here of how it works with Gotify. We will add the Alerter to the Komodo Core stack. Navigate to your stack and edit it using Nano or Vim. Then add the following service:
  komodo-gotify:
    image: foxxmd/komodo-gotify-alerter:latest
    container_name: komodo-gotify
    restart: unless-stopped
    environment:
      # Connection
      GOTIFY_URL: ${GOTIFY_SERVER}
      GOTIFY_APP_TOKEN: ${GOTIFY_TOKEN}
      # Priority
      GOTIFY_OK_PRIORITY: 3
      GOTIFY_WARNING_PRIORITY: 5
      GOTIFY_CRITICAL_PRIORITY: 8
      # Timeout
      UNRESOLVED_TIMEOUT_TYPES: "ServerCpu,ServerMem,ContainerStateChange"
      UNRESOLVED_TIMEOUT: 15000
    ports:
      - "7000:7000"
Then replace ${GOTIFY_SERVER} and ${GOTIFY_TOKEN} with your Gotify URL (gotify.example.com) and your Gotify App Token or edit the .env file that we created for Komdo and add the following at the bottom of the file:
# Gotify
GOTIFY_SERVER=gotify.example.com
GOTIFY_TOKEN=your_gotify_token
Now restart the stack with docker compose -p komodo up -d and then go to your Alerter that you created. Select Custom for the endpoint and enter http://komodo-gotify:7000 as the URL.
Once you have successfully configured the endpoint, you can select which alerts you want to receive notifications for under Alert Types below. After that, you just need to click Save and then you can send a Test Alerter further up to check if everything worked.
One advantage of FoxxMD's alerter is that you can specify certain types for which you want to receive delayed notifications. For example, it happens repeatedly that certain servers temporarily experience high CPU usage, or when deploying a stack, the stack is temporarily marked as faulty. Komodo then sends you a notification right away.
For these alerts, we can specify as an environment variable for which of these types the message should only be sent if the alert persists for a certain time. For example, the notification will only come if the CPU remains above 90% for more than 15 seconds.
As we've already seen above with the Gotify Alerter, the following variables are responsible for this:
# Timeout
UNRESOLVED_TIMEOUT_TYPES: "ServerCpu,ServerMem,ContainerStateChange"
UNRESOLVED_TIMEOUT: 15000
You can customize this according to your preferences.
Can I manage the Komodo stack with Komodo itself?
This might sound a bit silly but yes, it works! You can put the Komodo stack in your Git repository, then add the stack to Komodo and let Komodo manage itself.
It is important that Periphery runs either as a Systemd service or in a separate Docker command/stack like Komodo Core on the device where Komodo Core is installed. If you run Periphery in the same stack as Core and then execute a redeploy, it will be interrupted because Periphery will also restart during the redeploy. That is also the reason why I already separated the two in the example above.
Do I need to install Periphery manually on each server?
If you're somewhat familiar with automation in the server space, you've probably already heard of Ansible. This is, for example, a very good task that Ansible executes superbly. Personally, I use Ansible to distribute and keep up-to-date all my Komodo peripherals on my servers.
You can install Periphery as a Systemd service on any server using Ansible, but personally, I simply use a Docker image which I deploy. Here is an example playbook that can be executed with Ansible.
---
- name: Manage Container Komodo Periphery
  hosts: docker
  become: true
  vars:
    container_name: komodo-periphery
    image: ghcr.io/moghtech/komodo-periphery:latest
    ports:
      - "8120:8120"
    volumes:
      - "/var/run/docker.sock:/var/run/docker.sock"
      - "/proc:/proc"
      - "/etc/komodo:/etc/komodo"
      - "/docker/storage:/docker"
    env_vars:
      PERIPHERY_REPO_DIR: "/etc/komodo/repos"
      PERIPHERY_STACK_DIR: "/etc/komodo/stacks"
      PERIPHERY_SSL_ENABLED: "false"
      PERIPHERY_SSL_KEY_FILE: "/etc/komodo/ssl/key.pem"
      PERIPHERY_SSL_CERT_FILE: "/etc/komodo/ssl/cert.pem"
      PERIPHERY_PASSKEYS: "{{ lookup('env', 'KOMODO_PERIPHERY_PASSKEYS') }}"
      PERIPHERY_INCLUDE_DISK_MOUNTS: "/etc/komodo,/docker"

  tasks:

    # UPDATE MODE
    - name: Get current local image ID (before pull)
      community.docker.docker_image_info:
        name: "{{ image }}"
      register: old_image_info
      ignore_errors: true
      tags:
        - update

    - name: Pull latest image
      community.docker.docker_image:
        name: "{{ image }}"
        source: pull
      register: image_pull
      tags:
        - update

    - name: Get image ID after pull
      community.docker.docker_image_info:
        name: "{{ image }}"
      register: new_image_info
      tags:
        - update

    - name: Set fact if image was updated
      set_fact:
        image_updated: "{{ old_image_info.images[0].Id != new_image_info.images[0].Id }}"
      when: old_image_info.images is defined and old_image_info.images | length > 0
      tags:
        - update

    - name: Remove existing container if update is available
      community.docker.docker_container:
        name: "{{ container_name }}"
        state: absent
      when: image_updated | default(false)
      tags:
        - update

    - name: Ensure container is running (Update mode)
      community.docker.docker_container:
        name: "{{ container_name }}"
        image: "{{ image }}"
        state: started
        restart_policy: unless-stopped
        log_driver: local
        ports: "{{ ports }}"
        volumes: "{{ volumes }}"
        env: "{{ env_vars }}"
      when: image_updated | default(false)
      tags:
        - update

    # REDEPLOY MODE – always recreate container with fresh image
    - name: Stop and remove container (Redeploy mode)
      community.docker.docker_container:
        name: "{{ container_name }}"
        state: absent
      tags:
        - redeploy

    - name: Remove cached image (Redeploy mode – force pull)
      community.docker.docker_image:
        name: "{{ image }}"
        state: absent
        force_absent: true
      tags:
        - redeploy

    - name: Pull latest image (Redeploy mode – fresh pull)
      community.docker.docker_image:
        name: "{{ image }}"
        source: pull
      tags:
        - redeploy

    - name: Deploy fresh container (Redeploy mode)
      community.docker.docker_container:
        name: "{{ container_name }}"
        image: "{{ image }}"
        state: started
        restart_policy: unless-stopped
        log_driver: local
        ports: "{{ ports }}"
        volumes: "{{ volumes }}"
        env: "{{ env_vars }}"
      tags:
        - redeploy

    # DELETE MODE – clean removal
    - name: Delete container completely
      community.docker.docker_container:
        name: "{{ container_name }}"
        state: absent
      tags:
        - delete
Templates for creating stacks
If you have many stacks, it might eventually become annoying to enter all the information like Git provider, account, repository, etc. for each stack over and over again. There's a simple trick to avoid this.
Simply create a New Stack under Stacks which you use as a Template. Configure all the default settings that you want to have for any new stack here.
When you want to create a new stack in the future, instead of clicking on New Stack, click on the Template and then click Copy in the top right. Then enter the name for your new stack and a copy of the Template stack will be created. You can then use this for your new stack.
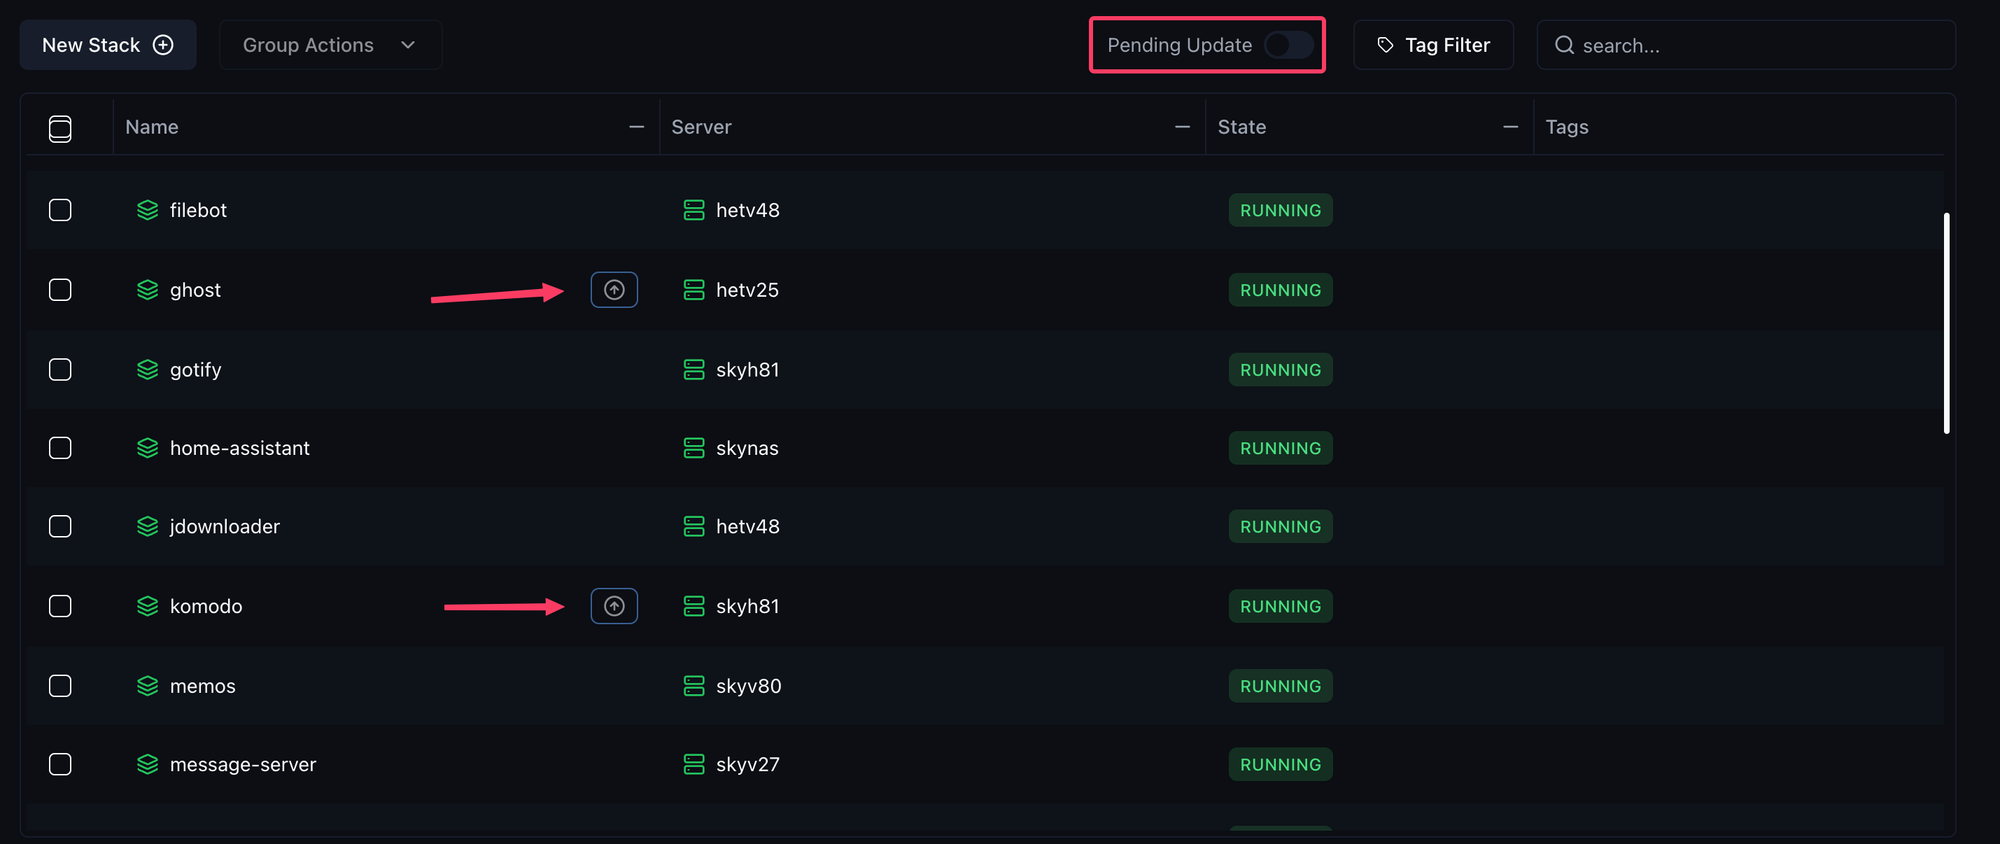
How does the detection of the newest images (Auto Update) work?
In the Stack configuration, there are 3 different buttons for updating:
Poll For Updateperforms a docker image pull at regular intervals to check if there is a new version of the image being used.Auto UpdateWhen you activate this, the container automatically restarts when a new image is detected. The container then starts with the new image.Full Stack Auto UpdateWhen you activate this button, the entire stack restarts even if only one container in the stack has a new image available.
It's important to know that Komodo only pulls new images with the same tag since, as mentioned before, it simply executes a docker image pull. Komodo doesn't detect updates across different tags. Therefore, for the best functionality, you should always use the latest tag.
For example, if you have an image that uses the 1 tag, all updates within this tag should be detected, such as 1.1 or 1.2.1, but as soon as the developer releases version 2, no further updates will be detected.
If you have only Poll For Updates enabled, you will see in the UI when an update is available. You can also filter by Pending Updates to see all stacks for which an update is currently available.
For the Alerters you have the following Auto Update options that you can set:
DeploymentImageUpdateAvailableif you only usePoll For Updates.DeploymentAutoUpdatedif you also useAuto Update.
Is it possible to attach to a running container terminal
Yes! With version 1.17.4, Komodo gets terminal support allowing you to access the server via shell through Periphery. This now also provides the ability to connect to a container using Komodo.
Note that when hosting Periphery via Docker container, you will connect to the Periphery container rather than the host. You can still execute Docker commands since the Docker socket is mounted into the Periphery container. If you want to access the host system via terminal, you need to install Periphery using Systemd.
But how does it work? First, make sure that you have at least version 1.17.4 installed on both Komodo Core and Periphery.
Then go to Servers in Komodo and select a server. You will now see that the Terminals item has been added. Click on it and a session will start immediately. You can now execute all commands that are available in the Periphery Container or on the host, just as if you were connecting to the server via SSH.
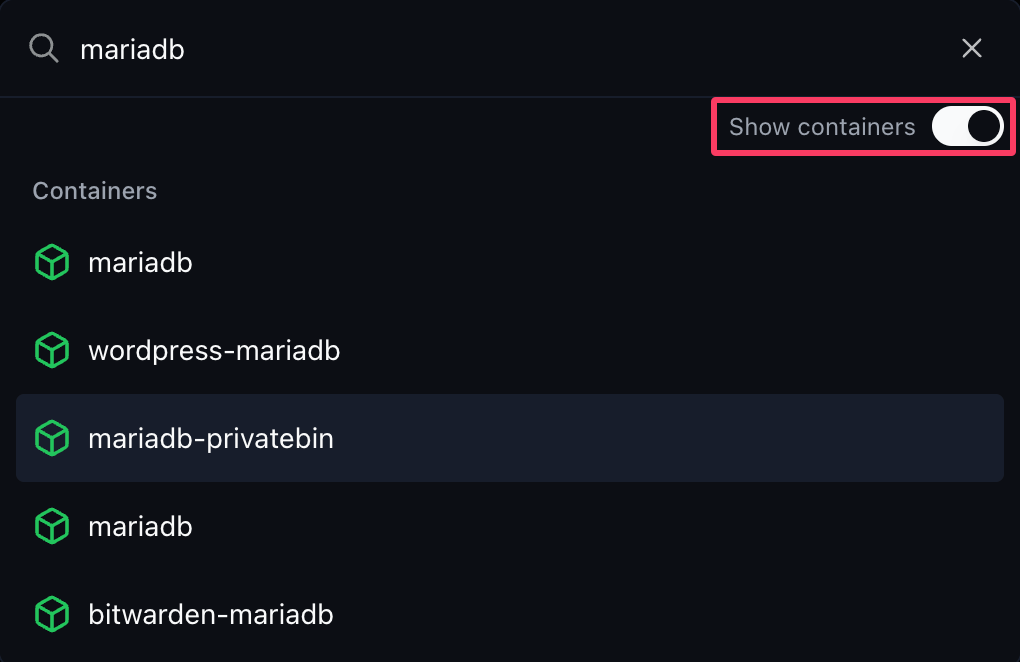
There are two ways to connect to a Container. The first step is to select the container under Containers, search for the container, or go through Stacks > Your Stack > Services > Your Container. When searching, make sure you have Show containers" active.
After you have opened the container, you will see the new Terminal tab. Click on it and you will be directly connected to the container. You can then also choose how you want to connect to the container, via sh or bash or something else.
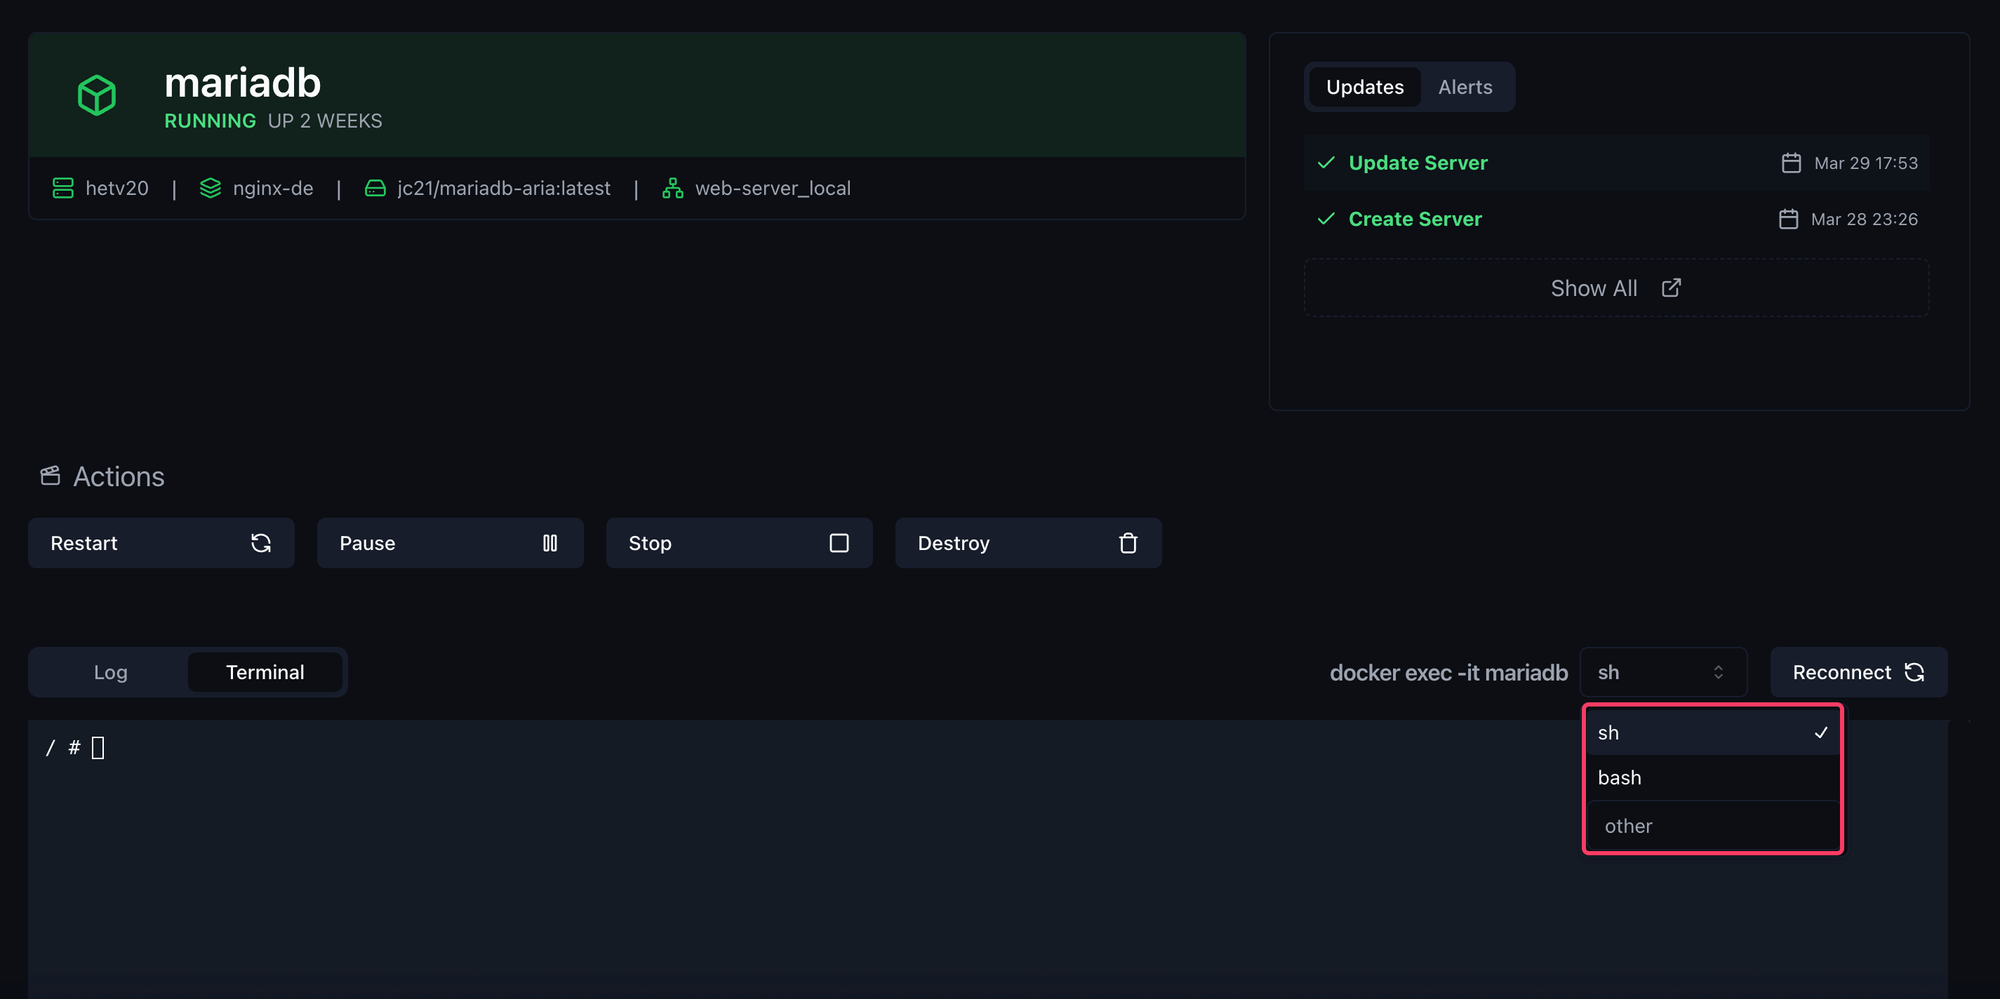
The second approach is to execute the docker command directly through the server terminal. It would then look something like this:
docker exec -it container_name shMake sure to replace container_name with the name of the container you want to connect to. Depending on the container, you might need to use bash instead of sh at the end. Of course, you can only connect to containers that are running on the server where you opened the terminal session.

The terminals are started by Komodo Core, which means that even if you lose connection to Core or close your browser for example, you can reconnect later and the session will continue exactly as you left it.
The respective terminals are also live synchronized if you have multiple instances open.
Additional facts:
- If Periphery is restarted, all Terminal sessions will be lost since they are child processes of Periphery.
- User must be admin or have
Writepermission on Server to connect to terminals - Use
disable_terminals(PERIPHERY_DISABLE_TERMINALS) in periphery config to disable this functionality on particular servers. The value of the variable to deactivate it istruehere.


Discussion